


While migrating to the SAP S/4HANA system, businesses often have a few custom fields on their Customer and Vendor master data which need to be saved post conversion. These fields can be placed in a custom tab on the Business Partner transaction.
We share how you can transfer enhancements made in the Customer and Vendor master to Business partner (BP) transaction. This ensures that the data maintenance to these enhanced fields will not be impacted after upgrading the S/4HANA system. In SAP ERP systems, customer and vendor master data transactions have been enhanced with additional fields using BADI. In Customer and Vendor master transactions, the fields can be improved and integrated by adding additional sub-screens to existing screens.
We can follow two approaches that can be implemented while adding custom fields to Business Partner transactions:
- Integrating all existing tables in the customer namespace that refers to the Customer/Vendor master
- Using custom append structures to respective master tables like KNVV, and KNB1
This blog outlines how the transaction BP can be enhanced using Approach 2 and BDT process.
What are the tools to enhance Business Partner Transaction?
Enhancements to Business Partner (BP) Transaction can be made using tools like:
- BDT (Business Data Tool Set) – Using this technique, we can enhance the BP transaction with custom screens
- CVI Synchronization – Using this technique, we can map the data from BP to the customer/vendor, which then can be saved to a database.
Process and Configuration steps:
In this approach, we have to enhance the structure CVIS_EI_EXTERN with an append structure in the respective area. For example, if we have to improve the company code details with custom fields for a customer (CVIS_EI_EXTERN- CUSTOMER COMPANY_DATA- COMPANY- DATA / DATAX), make sure you add the same custom fields to the structure DATA and DATAX.
To enhance the BP transaction, we must follow the BDT process, which involves creating elements like field groups, screens, views, and selections. The transaction for initiating the BDT menu is BUPT.
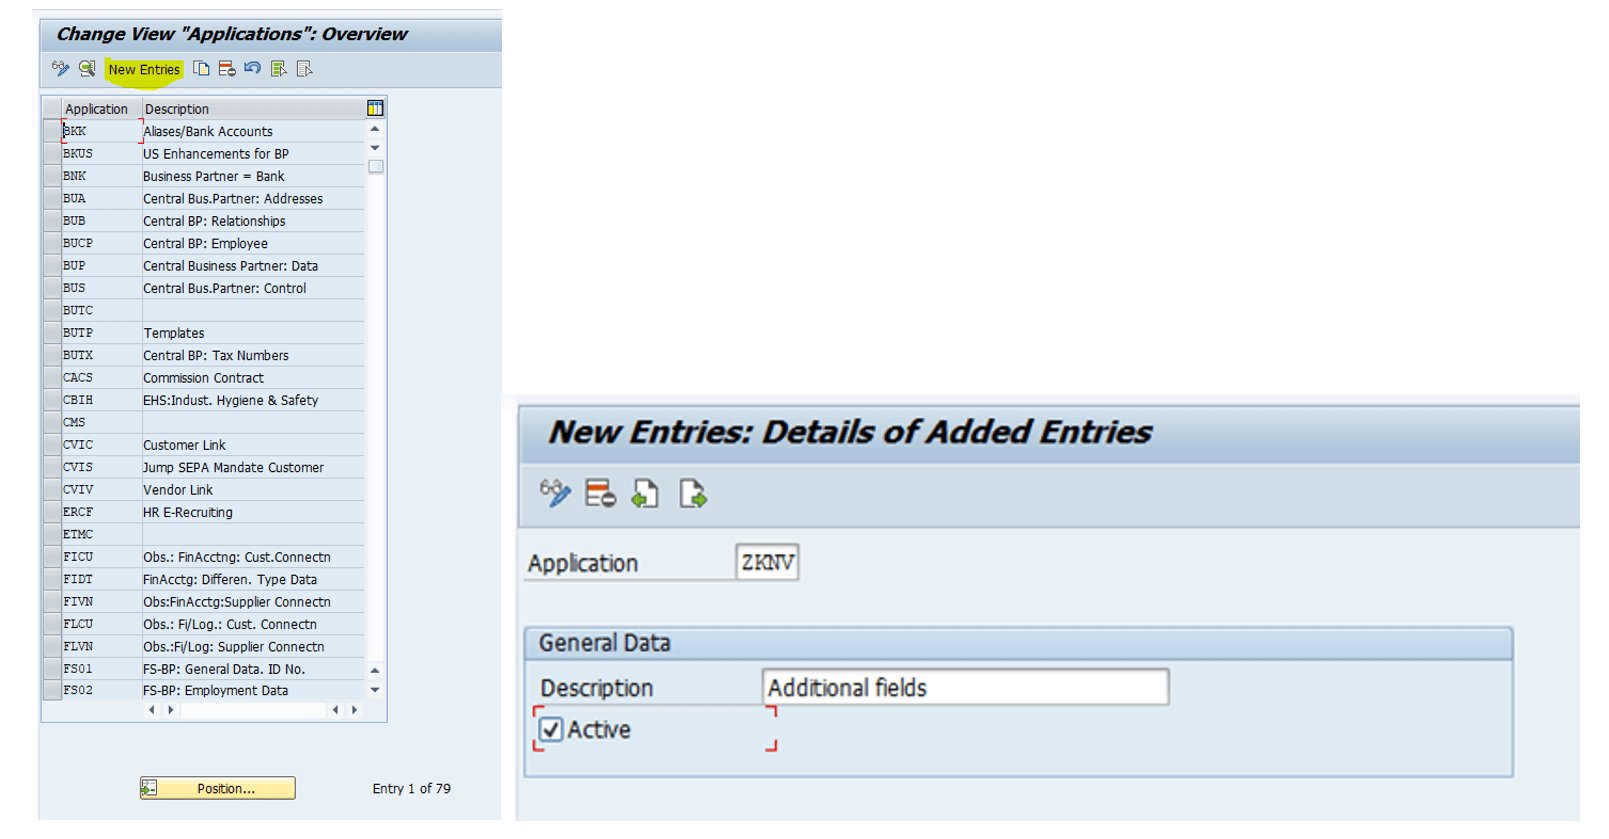
Create BDT Application – BUS1
BDT Application is essential while enhancing the transaction BP. It holds all the respective screens and views and helps manage the data flows. Using different BDT applications for customer and vendor screen enhancements is recommended. Using a unique naming convention is recommended to identify the custom application quickly. For instance – ZKNV.
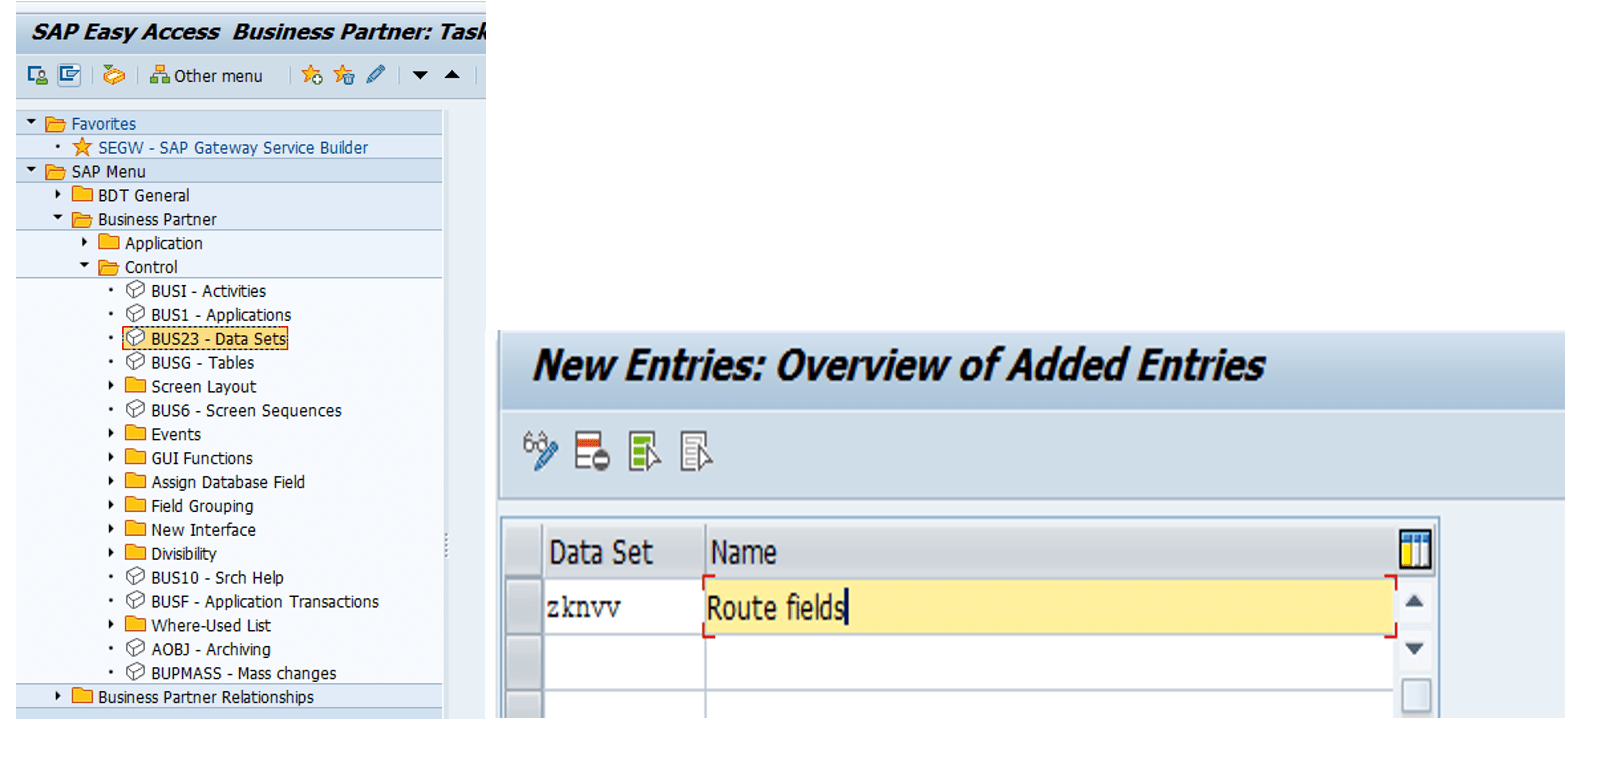
Create BDT dataset – BUS23
Datasets split attributes for an application object into meaningful business units. Each attribute can only belong to one data set. When defining views, you can assign a data set to a view. Relevant datasets are assigned to corresponding BP roles. It is recommended to use the application name in the dataset. Example – ZKNVV
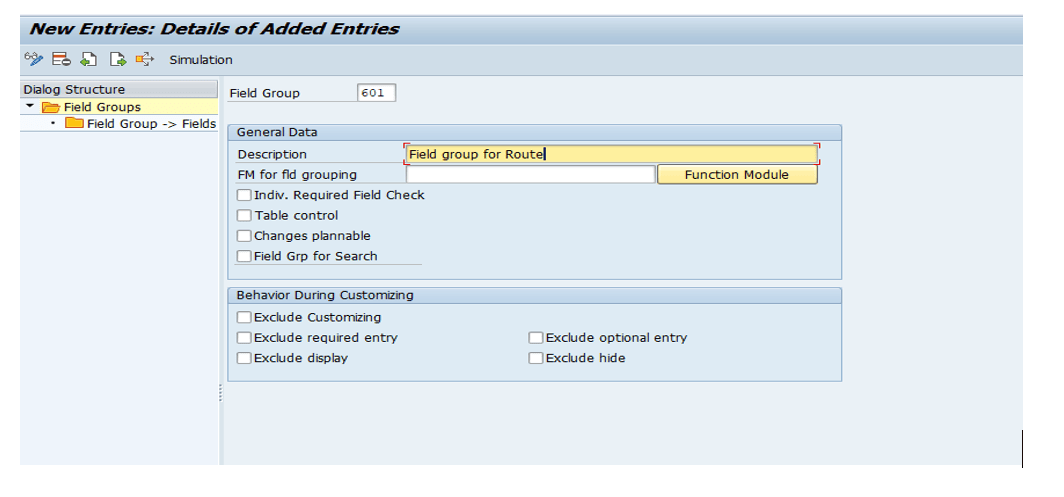
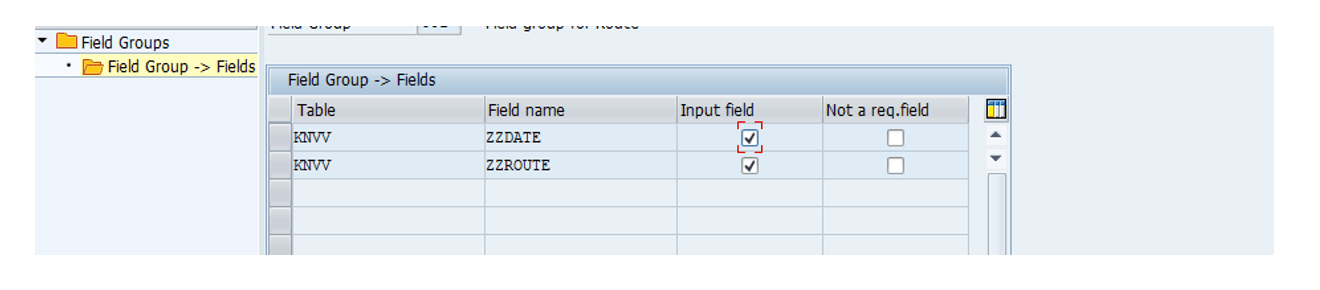
Create Field Group – BUS2
Field Groups control the field status on the screen, like the input field and mandatory field. All fields added to the custom screen must be linked to the field group. In addition, a function module for the FMOD2 event in the field group is to be added. You can add field modification logic for field groups from the standard FMOD-function modules.
- CVIC_BUPA_EVENT_FMOD2 – Customer general data
- CVIV_BUPA_EVENT_FMOD2 – Vendor general data
- CVIC_BUPA_EVENT_FMOD2_SALES – Sales data
- CVIV_BUPA_EVENT_FMOD2_PORG – Purchasing Org. data
- CVIC_BUPA_EVENT_FMOD2_CC – Company code data
- CVIV_BUPA_EVENT_FMOD2_CC – Company code data
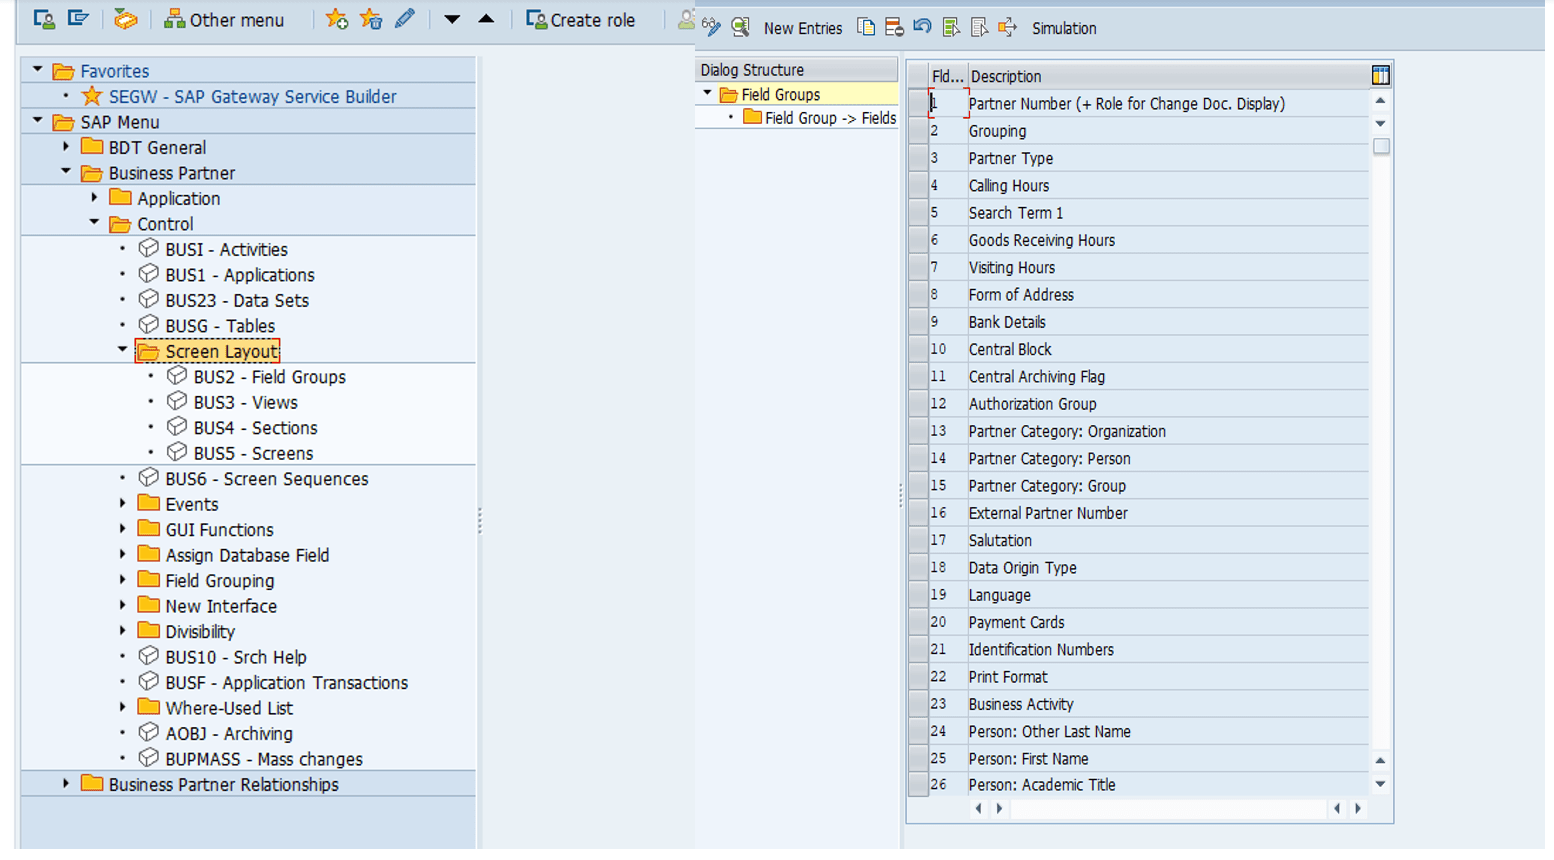
After saving, double-click on field group->fields in the left pane on the same screen.
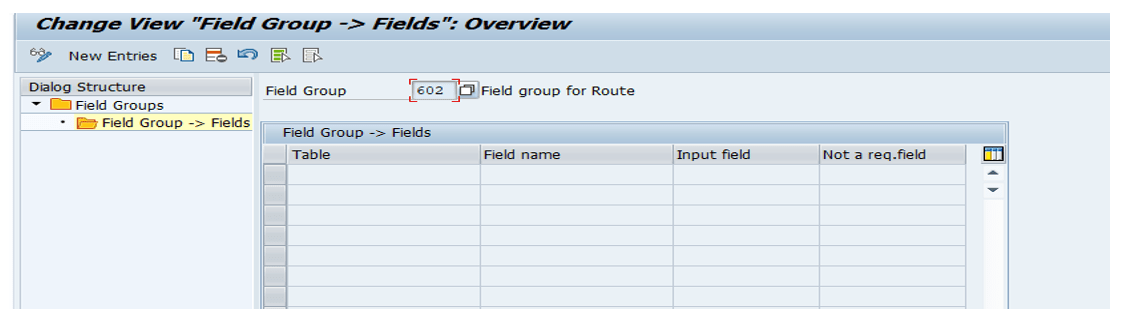
Provide the required additional fields that need to be displayed on the enhanced screen.
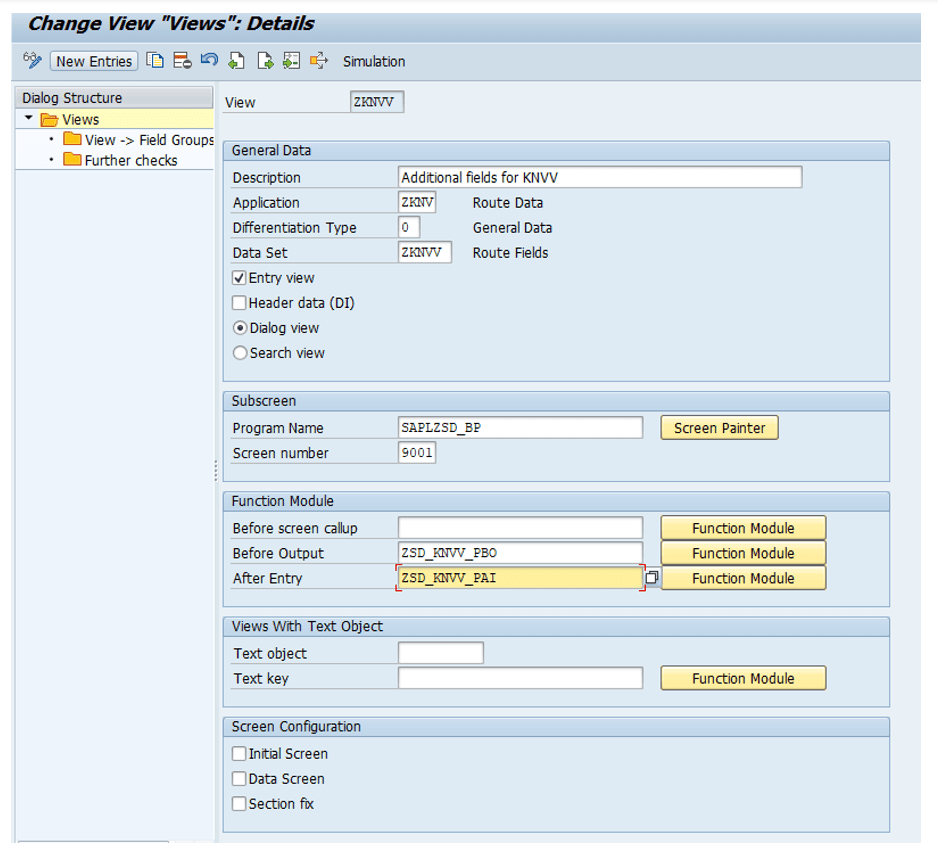
Create Views – BUS3
View acts as a central hub to link the BDT application, the data set, and the screen. A central function group with custom Screen and PBO and PAI function modules are to be added to the view. In addition, the fields are assigned to the views via field groups. The coding in the PBO and PAI modules can be copied from the standard modules.
- CVIC_BUPA_PBO_CVIC01 / CVIC_BUPA_PAI_CVIC01 for general customer data
- CVIC_BUPA_PBO_CVIC15 / CVIC_BUPA_PAI_CVIC15 for sales area customer data
- CVIC_BUPA_PBO_CVIC30 / CVIC_BUPA_PAI_CVIC30 for company code customer data
- CVIV_BUPA_PBO_CVIV01 / CVIV_BUPA_PAI_CVIV01 for general vendor data
- CVIV_BUPA_PBO_CVIV30 / CVIV_BUPA_PAI_CVIV30 for company code vendor data
- CVIV_BUPA_PBO_CVIV71 / CVIV_BUPA_PAI_CVIV71 for purchasing vendor data

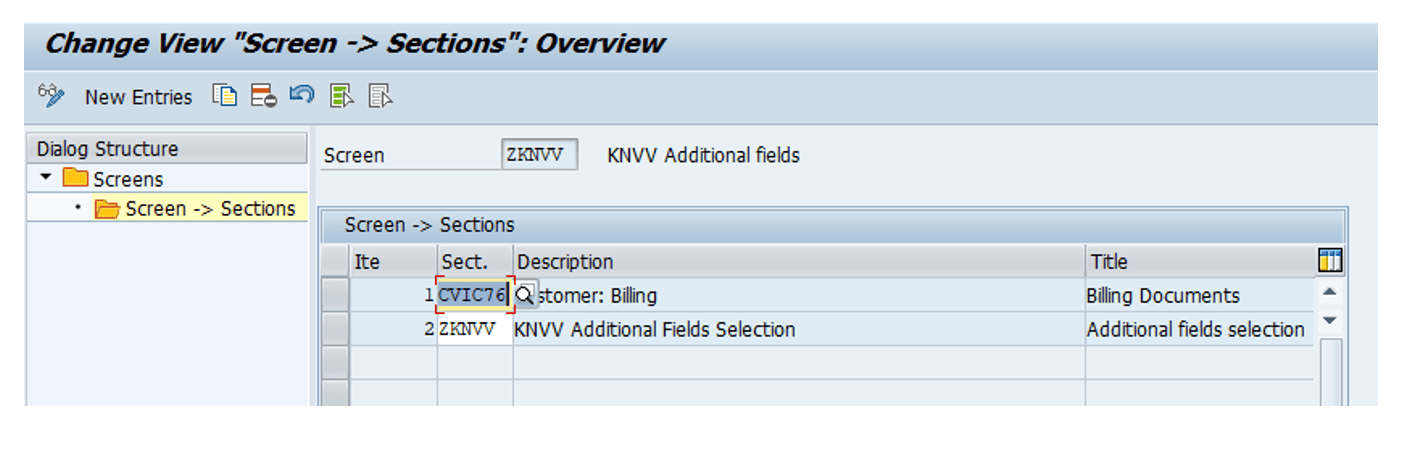
Create Sections – BUS4
Sections are used to link the BDT application to the view. Sections are connected with the frame title, displayed in the BP transaction.
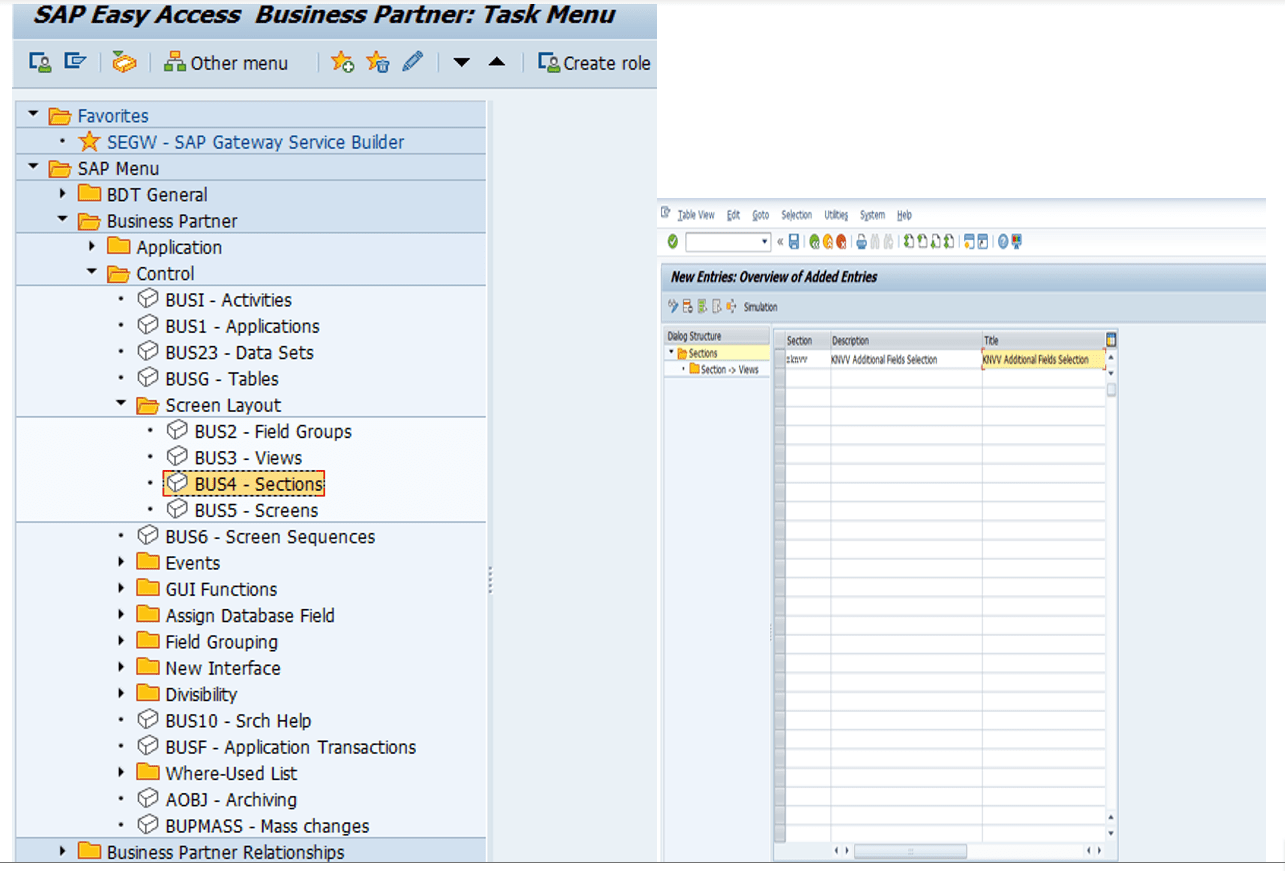
Come back, select the created section, and double-click on sections – views.
Click on new entries, provide the item number, view the name, and save it.

Create Screens – BUS5
When creating a new screen, it is necessary to assign the correct header section to this screen. The header section must be the first section on the screen. It must have the lowest item number. Different header sections must be assigned for general, company code, sales area, and purchasing organization data. If the appropriate Header section is not assigned, then the data flow between standard and custom screens will not be correct, resulting in data inaccuracy.
| Data Segment | Header Section |
|---|---|
| Customer General | BUP009 Header Data (General Screens) |
| Customer Company Code | FI0201 Header Data (Company Code-Dependent Screens) |
| Customer Sales Area | CVIC00 Header Data (Sales Area-Dependent Screens) |
| Vendor General | BUP009 Header Data (General Screens) |
| Vendor Company Code | FI0201 Header Data (Company Code-Dependent Screens) |
| Vendor Purchasing Org. | CVIV00 Vendor: Header Data (Purchasing Organization) |

Select the screen created, double-click on the screen – sections, and provide the sections.
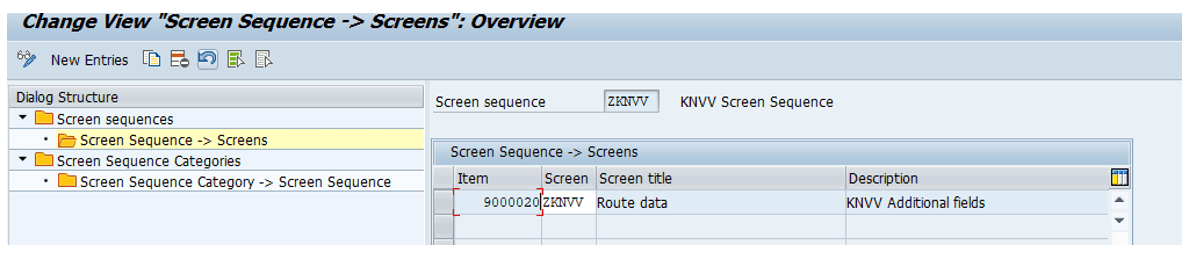
Screen sequences – BUS6
A screen sequence contains the maintenance screens displayed in succession by the functions on the next screen or previous screen. You can store as many screen sequences as you want for each application object. If the application object uses object parts, you can define which screen sequence should be used for each object part. In all other cases, the standard screen sequence is used.
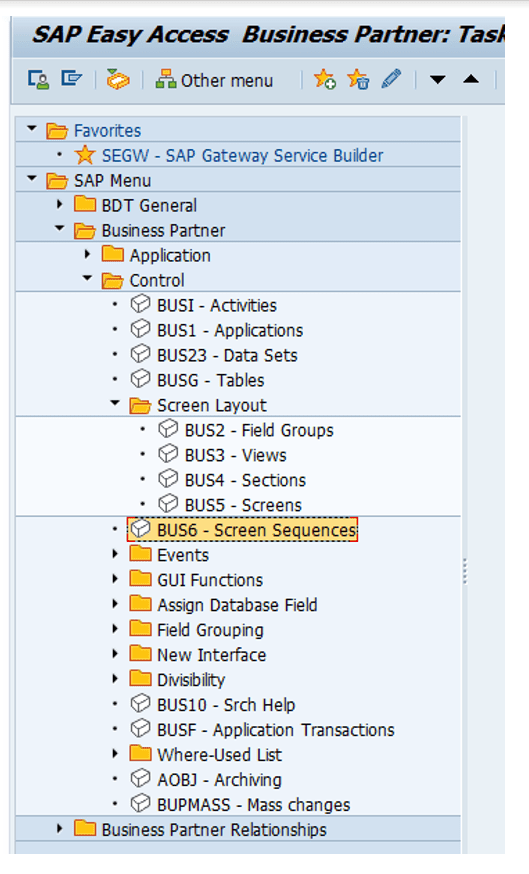
Double-click on the screen sequence.
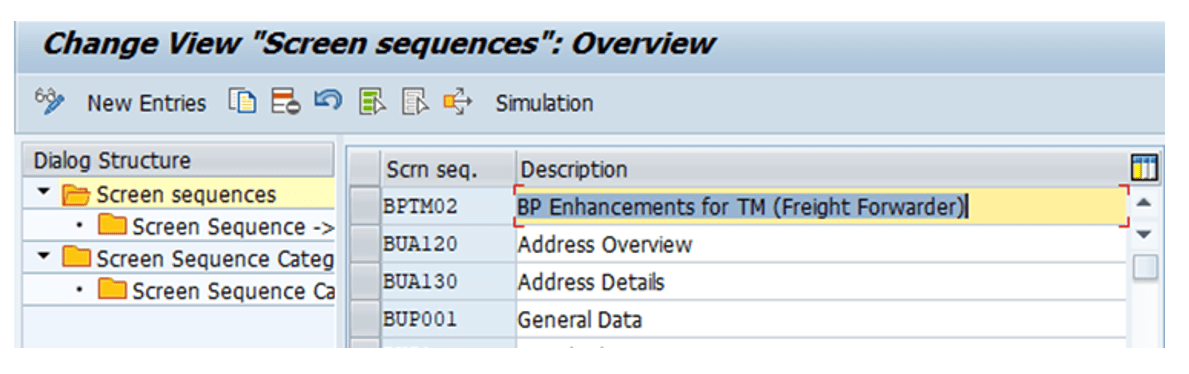
Click on new entries.
Provide the screen sequence and its description and save it.
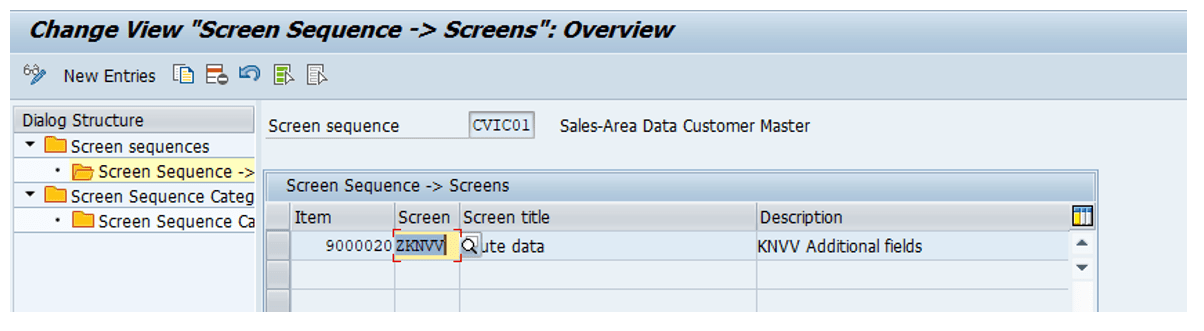
Select the screen and double-click on screen sequence screens.
Click on new entries, and provide the item and screen.
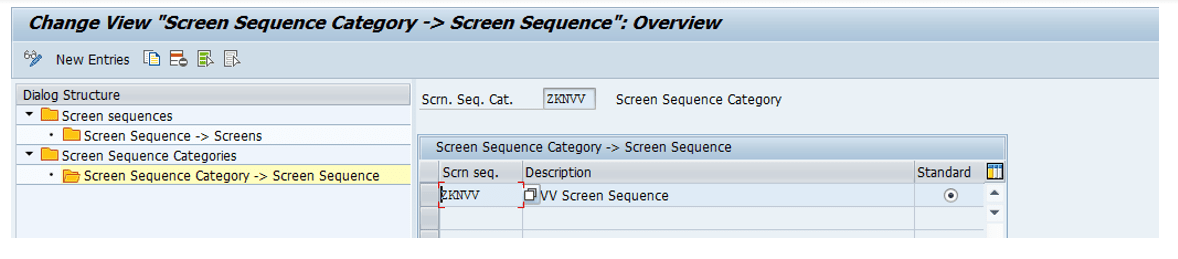
Now double-click on screen sequence categories and click on new entries.

Provide the screen sequence category, description, and divisibility.

Now select the screen sequence category we created, double-click on the screen sequence category screen sequence and click on new entries.
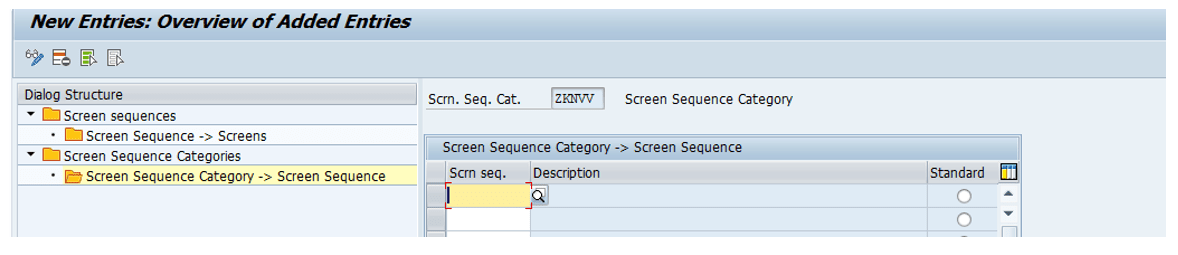
Provide the screen sequence and select the radio button and save it.
Go back to screen sequences.
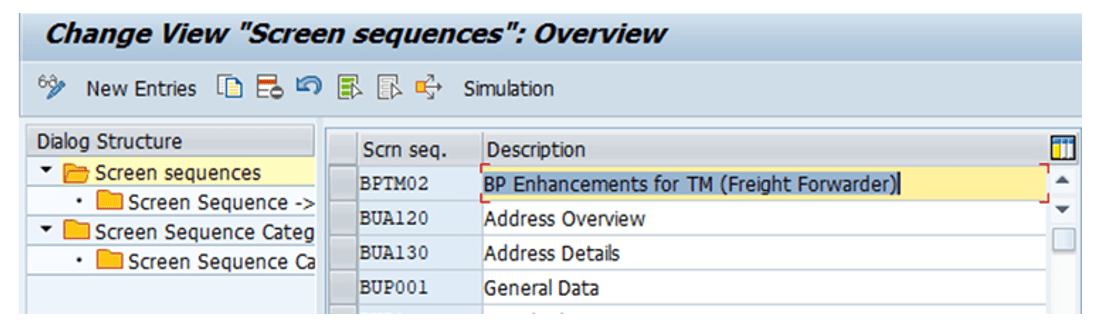
Select the screen sequence where we need to get the additional (custom) tab and double-click on screen sequence screens.
Now provide the item number and screen and save it.
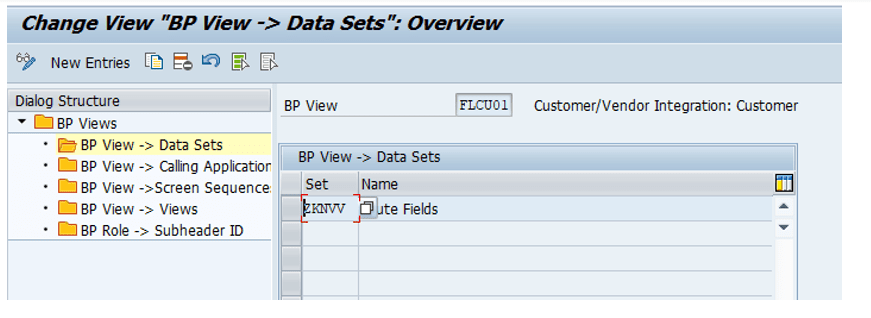
In My Requirement, the new tab is to appear in FLCU01 customers.
Go back to BUPT initial screen and select the divisibility.
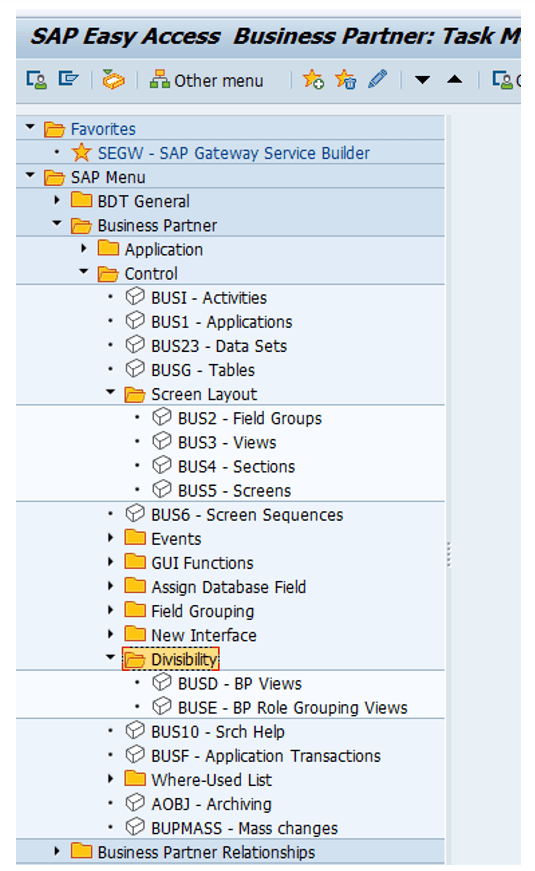
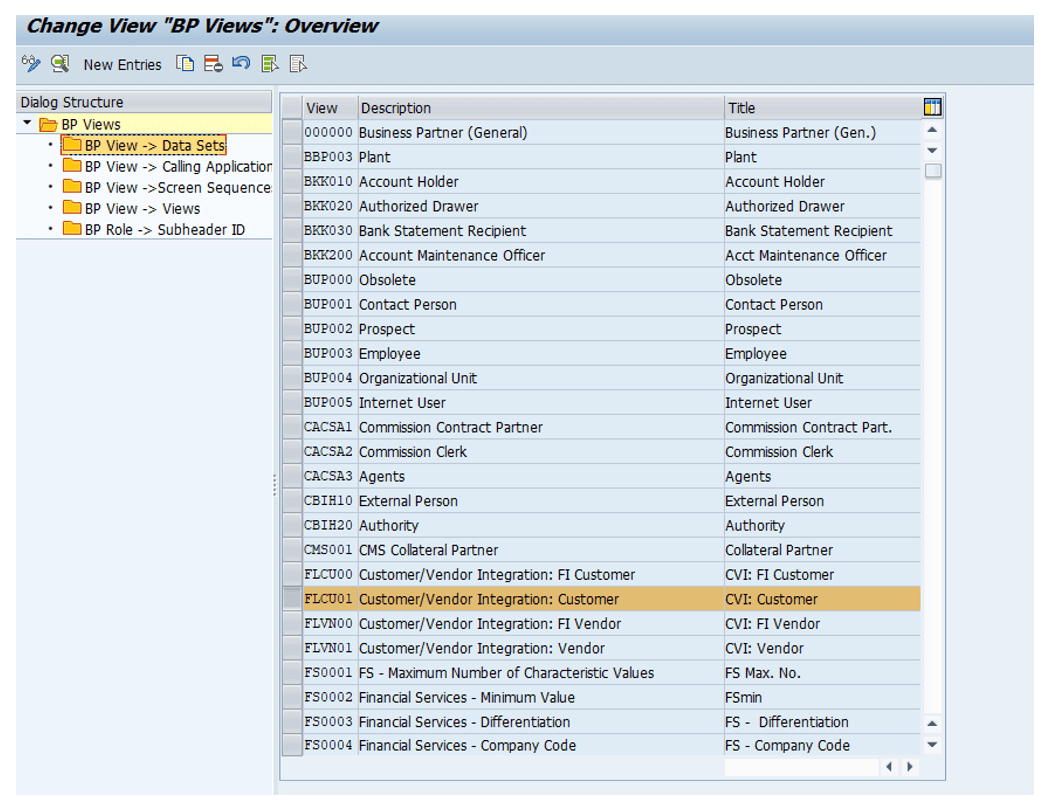
Double-click on BP views.
Select the desired view and double-click on BP view Data sets.
Now click on new entries, provide the set name and save the changes.
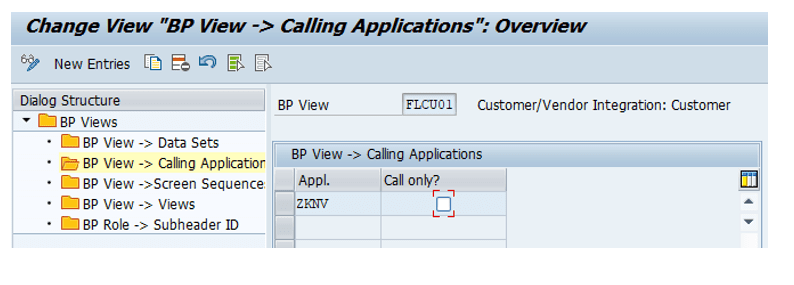
Double click on BP View Calling application and provide the application and save the changes.
Create Events – BUS7
If special fields like buttons for navigating to a pop-up were added to the screen, these need to be considered. In this case, a separate event function module must be created and assigned to the corresponding event (e.g., FCODE). It is necessary to implement additional event function modules for displaying the change documents for your table(s) in transaction BP. Sample code can be copied from standard CHGD* function modules.
- CVIC_BUPA_EVENT_CHGD1 / CVIV_BUPA_EVENT_CHGD1
- CVIC_BUPA_EVENT_CHGD3 / CVIV_BUPA_EVENT_CHGD3
- CVIC_BUPA_EVENT_CHGD4 / CVIV_BUPA_EVENT_CHGD4
Assign data set and application to BP Role – BUSD
Assign the created data sets and application to the BP role. If the corresponding data sets and applications are not assigned, the screen enhancement will not appear on the BP role. Also, make sure that the application is in an active state. As the application acts as a central hub to the data set, view, and screen, if this is not active, screen enhancement will not appear on the BP role.

More From Author.
Related Posts.


Outgrowing Your ERP? How Australian Businesses Can Go Live in 8–10 Weeks
Jai Prakash Nethala


The SAP GROW Story: What Changed, What Stayed, and What It Means for Growing Businesses
Jacinto Arauz Jai Prakash Nethala

SAP S/4HANA: The Digital Core for Southeast Reshoring
Jacinto Arauz Sanjeev Jain
Connecting AI Agents to SAP S/4HANA via MCP
Shrina Neema

From Silos to Smart Systems: Why MEA Healthcare Needs Connected Intelligence
Murali Krishna Chilla