


Over the past few weeks, I’ve been writing some of the most common machine learning algorithms from scratch.
Now let’s implement them to solve some real-world problems.
Let’s start with creating a simple Spam Messages Detector using Logistic Regression. Logistic regression is a simple method of classifying data — be it hot or not hot, spam or not spam.
Although, there are few Python libraries like Scikit that can simply ask you to feed input and library can perform the entire operation of classification of our own- but to get a firm understanding of what happens under the hood.
Assuming that you are no more tyro to logistic regression, we will begin with data set. The dataset we have used is SMS Spam Collection Dataset from Kaggle. We have our training data in two columns(type and text).

Before we start with coding stuff, let us first analyse the data set. In our first column, we have classified our data as spam and ham(not spam). It can be easily seen from the above image that text is in the form of a string and we need to first vectorize the string in the numerical list of list, so mainly this is used for learning vector representations of words.
What the hell is vectorization?
Most of the machine learning algorithms (read all), like logistic regression, understands only numbers. We need to figure out a way to convert a text sentence into numbers.
Vectorization is a simple process of converting a text sentence into an array of numbers.
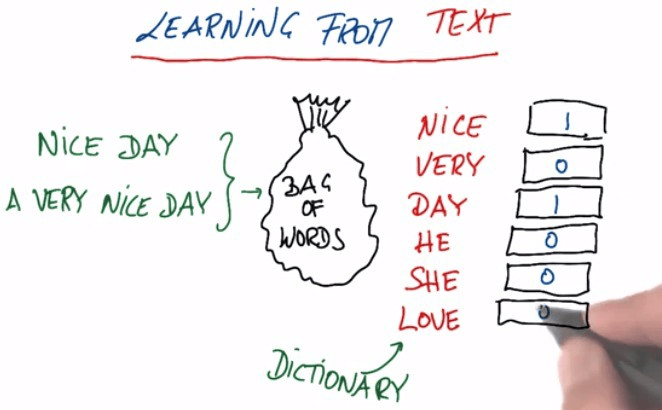
To do this, we need to create a dictionary of all unique words from the text column as key and indexing from zero as value. While iterating each value from text column (which is an array) and fetching the position (value) of the matched word (key) from the dictionary. We need to create another array of zero’s and simultaneously updating the position of this zero array corresponding to the matched key from our dictionary.
For example, I have a string say, ”Hello I am Anchit, and I love machine learning”, our unique dictionary and vectorize form of our input say “Anchit loves to travel” would look like the below dummy code
| string = “Hello I am Anchit, and I love machine learning.” | |
| dictionary = {‘hello’: 0, ‘i’: 1, ‘am’: 2, ‘anchit,’: 3, ‘and’: 4, ‘love’: 5, ‘machine’: 6, ‘learning’: 7} | |
| vectorize_str = “Anchit loves to travel and loves to write” | |
| vectorize = [0 0 0 1 0 2 0 0 ] |
The python implementation part is much easier.
| ## This method will read data and convert a string to vectors |
| def create_unique_dict(text_arr): |
| dictt = {} |
| count = -1 |
| x = np.array(text_arr) |
| text1 = (np.unique(x)) |
| for item in text1: |
| data = (item.lower().strip().split(” “)) |
| for item1 in data: |
| if item1 not in dictt: |
| count = count +1 |
| dictt[item1] = count |
| print((dictt)) |
| return dictt |
| def vectorize(text_arr,dictt): |
| vectors = [] |
| for sentence in text_arr: |
| vector = [0] * len(dictt) |
| words = (sentence.lower().strip().split(” “)) |
| for word in words: |
| index = dictt[word] |
| vector[index] += 1 |
| vectors.append(vector) |
| print(array(vectors)) |
| return vectors |
| x, y = read(“train.csv”) |
| dictt = create_unique_dict(x) |
| x = np.array(vectorize(x, dictt)) |
Now we have vectorized input in our hand, using this vector as input we will be working on following methods to predict the output from our model.
This should be pretty routine by now. We append a one’s array to our matrix. Then we concatenate an array of ones to X.
| def __add_intercept(self,X): | |
| intercept = np.ones((X.shape[0], 1)) | |
| return np.concatenate((intercept, X), axis=1) |
Speaking theoretically “sigmoid” is a function that takes inputs and to generate probabilities, logistic regression uses a function that gives outputs between 0 and 1 for all values of X and we have another function named “loss or cost function” that consists of parameters or weights we initialize them randomly but we keep them updated with our learning rate and we will use gradient descent to minimize our cost. Following lines of code will guide you further.
| def _sigmoid(self,z): | |
| return 1 / (1 + np.exp(-z)) | |
| def __loss(self, h, y): | |
| return (-y * np.log(h) – (1 – y) * np.log(1 – h)).mean() |
Now, to understand gradient descent, let us imagine the path of the river originating from the top of the mountain. The job of gradient descent is exactly that of what the river aims to achieve; to reach the bottom-most point of the mountain. Now, as we know, there is a gravitational force on the earth, and hence the river will keep flowing downwards until it reaches the foothill.
Similarly we wil,l iterate our sigmoid function several times probably in thousands and simultaneously using the output of the sigmoid function in loss function we will minimize the loss function. Below code will help you out in better understanding.
| def train(self,X,y): | |
| X = self.__add_intercept(X) | |
| # weights initialization | |
| self.theta = np.zeros(X.shape[1]) | |
| print(self.theta) | |
| # gradient descent | |
| for i in range(self.num_iter): | |
| z = np.dot(X, self.theta) | |
| h = self._sigmoid(z) | |
| gradient = np.dot(X.T, (h – y)) / y.size | |
| self.theta -= self.lr * gradient | |
| z = np.dot(X, self.theta) | |
| h = self._sigmoid(z) | |
| loss = self.__loss(h, y) |
This is probably the most crucial part of our model where we predict our model. Here we need to understand our prediction since we have set of input (X) and theta’s (self.theta) we just need to focus on ` X @ theta.T ` which is a matrix operation of X and theta. It does not matter how many columns are there in X or theta, as long as theta and X have the same number of columns the code will work. We need to set a threshold variable at 0.5 for which values greater than 0.5 are classified in class 1 and values less than 0.5 are classified in class 0.
| def predict(self, X): | |
| file = open(“logistic_regression_model.pickle”,’rb’) | |
| self.theta = pickle.load(file) | |
| X = self.__add_intercept(X) | |
| prob = self._sigmoid(np.dot(X, self.theta)) | |
| return prob >= self.threshold |
Last but not the least it is always important to know our accuracy of the model so we can calculate the accuracy percentage of our model by passing the text and type column in this function and predicting the new type (predicted type) and then calculating the percentage using these features. Don’t you worry following lines of code will clear your more?
| def evaluate(self, test_x, test_y): | |
| y_predicted = self.predict(test_x) | |
| correct = 0 | |
| for i,y in enumerate(test_y): | |
| if y == 0: | |
| y = False | |
| else: | |
| y = True | |
| if y == y_predicted[i]: | |
| correct = correct + 1 | |
| total = y_predicted.size | |
| return (correct/total)*100 |
Meanwhile, you will be reading this line; I hope you are cleared with the process of mail classification. You can access the full code from here.
A few things to note about the limitations of my code:
- My code fails to understand the similarity of words like man and men, bed and beds etc. This can be solved using stemming and lemmatization.
- The classification accuracy can be improved by using more sophisticated algorithms like decision trees or neural networks
- Word2Vec can also drastically improve accuracy.
Contact us today for more information
Anchit Jain -Technology Professional – Innovation Group – Big Data | AI | Cloud @YASH Technologies

Anchit Jain
Anchit Jain -Technology Professional – Innovation Group – Big Data | AI | Cloud @YASH Technologies
More From Author.


Related Posts.

AWS Cost Optimization Tips
Pravish Jain


Why one should adopt DataOps?
Pravish Jain

Multicloud strategy
Pravish Jain

Hybrid Environment – Gotchas
Pravish Jain


DevOps & DataOps best practices
Pravish Jain


Embrace the future of customer onboarding in banking
Sumeet Kulshreshth

Designing a seamless process for digitalizing customer onboarding in Banking
Sumeet Kulshreshth